EEM Script to Generate Show Tech & Auto Reboot a router

While working through my CSR1000v stability woes, I had the need to automatically generate a “show tech” and then reboot a router after an IP SLA failure was detected.  It seemed fairly easy but I could never get the show tech fully completed before the EMM script would stop running, and the reboot command never worked either.

Posting on Reddit paid off as user caught the problem: EEM scripts by default can only run for 20 seconds.  Since a “show tech” can take longer than this, the subsequent steps may never be processed.  The solution is increase the runtime to say 60 seconds to guarantee the show tech completes:

! Create and run IP SLA monitor to ping default gateway every 5 seconds
ip sla 1
 icmp-echo 10.0.0.1 source-interface GigabitEthernet1
 threshold 50
 timeout 250
 frequency 5
!
ip sla schedule 1 life forever start-time now
!
! Create track object that will mark down after 3 failures
track 1 ip sla 1
 delay down 15 up 30
!
! Create EMM script to take action when track state is down
event manager session cli username "ec2-user"
event manager applet GatewayDown authorization bypass
 event track 1 state down maxrun 60
  action 100 cli command "en"
  action 101 cli command "term len 0"
  action 110 syslog priority notifications msg "Interface Gi1 stopped passing traffic. Generating diag info"
  action 300 cli command "delete /force bootflash:sh_tech.txt"
  action 350 cli command "show tech-support | redirect bootflash:sh_tech.txt"
  action 400 syslog priority alerts msg "Show tech completed. Rebooting now!"
  action 450 wait 5
  action 500 reload

Words of caution deploying the CSR1000v with DMVPN on AWS t2.medium instances

The last 6 months of my life have been living hell thanks to Cisco.  I was assigned a relatively simple project of configuring some CSR1000v virtual routers in Amazon Web Services for the purpose of DMVPN spoke termination.  It has been miserable thanks to the unprecedented number of bugs on a product that’s over 5 years old.

Adding to the confusion, the primary issue is specific to the t2.medium instance type.  Since these are by far the cheapest instances and support up to 250 Mbps throughput (more than adequate for most organizations) I suspect I’m not the first to encounter problems, but am the first to find the root cause.

Problem #1 – They crash!

We launched the first batch of CSR1000vs in January 2019.  I had meant to tell the person launching them to try and do very 16.6 since that was the company standard for IOS-XE, but they defaulted to 16.9.1.  However, everything seemed fine as basic configuration and connectivity tests were successful.  But a few days after launching some test instances, I noticed the routers had rebooted unexpectedly.   Fortunately this was easy to diagnose since there were crash files I could provide TAC.  The bug was this:

CSCvk42631 – CSR1000v constantly crashes when processing packets larger than 9K

Since most instances launched in AWS have a 9001 Byte MTU by default, going with this version was a non-starter.  No problem, 16.9.2 was already available so that’s an easy fix….or so I thought.

Problem #2 – They stop passing traffic

I copied over 16.9.2 and 16.6.5 software images.  Initially I just booted 16.9.2 to verify they no longer crashed.  Welp, now we have a different problem.

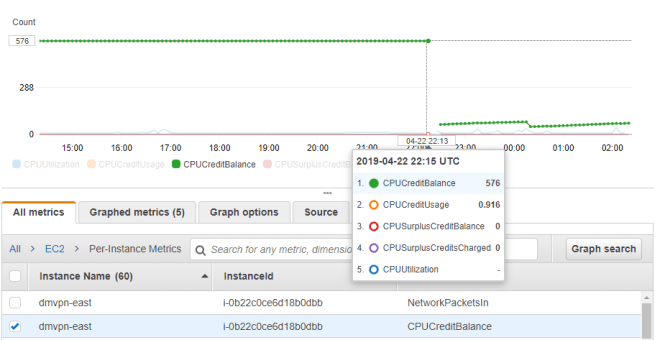
The systems team said they had lost connectivity in the middle of the day.  I tried logging in to the CSR1000v via its external internal and could not access it.  However, I was able to access the peer router and then hop in via the private interface.  I saw that the external interface had “no ip address assigned”, which would indicated it lost connectivity to the DHCP server and failed renewal.

Around this time I started scanning Reddit.  A user mentioned trying to roll out CSR1000vs on t2.mediums with DMVPN configured and having similar stability woes.  Cisco was of little use, but Amazon support blamed it on CPU micro-bursts likely caused by route changes.  Switching the instances from t2.medium to c4.large resolved the issue.  This really didn’t make sense to me, but I could see cases where bursts were triggering a near exhaustion of CPU credits.  I looked at CloudWatch and indeed would see cases of the CPU credit balances suddenly dropping, but could not tell if this was the root cause or simply a secondary symptom of it not passing traffic.  After doing some reading on this topic I switched the instances to  T2 unlimited, but even after a reboot, there was no behavioral change.

t2Medium_CPUCredits

I also followed the CPU red herring trail for a bit longer and found this

Features—Cisco IOS XE Fuji 16.7.1

The following new software features are supported on the Cisco CSR 1000v for Cisco IOS XE Fuji 16.7.1.
- Templates for vCPU allocation and distribution—including the Control Plane heavy template.

Sure enough, you can see lower on average CPU usage when upgrading to 16.7 and newer trains

csr1000v_cpu_166_vs_167.png

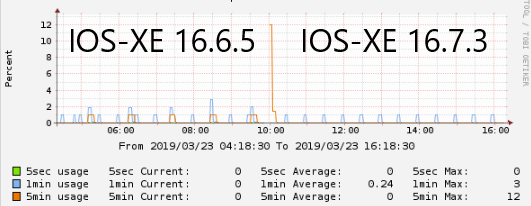
But this is still overall very low CPU usage that should certainly not be causing an interface to stop passing traffic entirely.  So we’re back to square one.

I’m now caught between a rock and a hard place because 16.6.4 and 16.9.1 will cause the router to crash and reboot, but 16.6.5 and 16.9.2 will cause one of the interfaces to stop passing traffic.  The work-around I came up with was create IP SLA monitors to ping the adjacent gateways combined with an EEM script to auto-reboot upon detection.

Update April 26th 2019: We have a bug ID!  CSCvp48213

Update May 24th 2019: We have a root cause.  It’s a problem related to Generic Receive Offload (GRO) being enabled at the Linux kernel level.  This will be fixed in 16.9.4 or 16.6.6, which are due out towards the end of 2019 😐

Update June 6th 2019:  I went back at the original bug and have a theory what the problem is.  Looks like between 16.9.1 and 16.9.2 they lowered the MTU at the vNIC level to 1500 bytes:

Router#show platform software system all
VNIC Details
============
Name Mac Address Status Platform MTU
GigabitEthernet1 12bf.4f69.eb56 UP 1500
GigabitEthernet2 1201.c32b.1d16 UP 1500

To me, this seems much more like a hackish workaround that a fix.

Problem #3 – Internal traffic is fine, but Internet traffic is painfully slow

After working through the above two problems, I finally got time to try upgrading to 16.10.1b.  Surprisingly, this fixed the stability problem.  No more crashes, no more freeze-ups.  But upon doing more detailed testing, we found a new issue – when using the CSR1000v for internet access (via NAT), speeds were horribly slow.  I would get 125 KBps at best despite having verified the 100 Mbps license was installed and “platform hardware throughput level” was configured and enabled.

ubuntu@ip-10-13-22-161:~$ curl ftp://ftp.freebsd.org/pub/FreeBSD/releases/i386/i386/ISO-IMAGES/11.2/FreeBSD-11.2-RELEASE-i386-bootonly.iso > /dev/null
 % Total % Received % Xferd Average Speed Time Time Time Current Dload Upload Total Spent Left Speed
100 261M 100 261M 0 0 30733 0 2:28:55 2:28:55 --:--:-- 92708

Very much seemed like a licensing issue since 125 KBps = 1 Mbps which is the speed set in evaluation mode.  But speeds going over an IPSec VPN tunnel were up to 50 Mbps, which made no sense.

Opened another TAC case and got nowhere.  Once again I’m on my own, so I desperately started reading release notes and find this:

CSCvn52259 – CSR1Kv:Throughput/BW level not set correctly when upgrade to 16.10.1 .bin image with AWS/Azure PAYG
We’re using BYOL rather than PAYG, but this seemed very suspicions since I had indeed upgraded from 16.9.X to 16.10.1.  Sure enough, I do another upgrade to 16.11.1a and speeds now jump to 100 Mbps!  This is also fixed in 16.10.2

I would suspect this has something to do with Smart licensing, since it is mandatory starting with version 16.10


tviUezPkMB8zTzccFGi3M661t4vQJL25Ic5ytcPFMr0


Using Cisco Smart Licensing on IOS-XE

Converting PAKs to Smart Licenses

First, convert existing PAKs to smart licensing by going to the Traditional Licensing Portal, selecting the PAK, and from the “Smart Accounts” tab, select “Convert selected PAKs to smart licensing”.

SmartLicensingConvert

Note that PAKs entered via the Smart Licensing portal are not automatically converted.

Router CLI Configuration

In config mode, enable DNS resolution on the device to communicate w/ Cisco

ip domain-lookup
ip name-server 8.8.8.8

Configure Smart Call-home

service call-home
call-home
 contact-email-addr me@mydomain.com
 profile "CiscoTAC-1"
  active
  destination transport-method http
  no destination transport-method email

In software versions prior to 16.12, Smart Licensing will need to be enabled in config mode:

license smart enable

Creating and Applying Smart License Tokens

Visit the Smart Licensing Portal, select the PAK, and generate a token.

SmartLicensingNewToken

In enable mode, paste the token in via CLI:

license smart register idtoken XXXXXXX

Verify token has been accepted and registration successful

show license status

Finish by configuring and verifying any features added by the license

platform hardware throughput level mb 250
Wait for 250M license request to succeed

license boot level ax
% use 'write' command to make license boot config take effect on next boot

Router# show platform hardware throughput level 
The current throughput level is 250000 kb/

Re-initializing Licenses after Software Downgrade

When upgrading or especially downgrading IOS-XE versions, you’ll typically see an error the that license has already been used:

Router#show license status
Smart Licensing is ENABLED

Registration:
  Status: UNREGISTERED - REGISTRATION FAILED
  Export-Controlled Functionality: Not Allowed
  Initial Registration: FAILED on Mar 20 01:22:15 2019 GMT

Failure reason: The product regid.2013-08.com.cisco.CSR1000V,1.0_1562da96-9176-4f99-a6cb-14b4dd0fa135 and sudi containing udiSerialNumber:9PFNTCW3Y0L,udiPid:CSR1000V has already been registered.

Or red herring messages like this:

%SMART_LIC-3-AUTH_RENEW_FAILED: Authorization renewal with the Cisco Smart Software Manager or satellite : Response error: Data and signature do not match 
%SMART_LIC-3-AUTH_RENEW_FAILED: Authorization renewal with the Cisco Smart Software Manager or satellite : NULL 
%SMART_LIC-3-AUTH_RENEW_FAILED: Authorization renewal with the Cisco Smart Software Manager or satellite : verify RESP fail

Simple fix: just re-install a token with the “force” option at the end, i.e:

license smart register idtoken XXXXXXX force

Cisco CSR1000v in AWS: IPSec tunnel configuration

Using IKEv1 w/ IPSec tunnels, the PSK address and tunnel destination should be the public IP of the remote side, even if the other router is behind NAT using Elastic IP:

crypto isakmp key XXXXXXXX address PUBLIC.IP.OF.REMOTE
crypto isakmp invalid-spi-recovery
crypto isakmp keepalive 10 10
!
crypto ipsec security-association replay window-size 1024
!
crypto ipsec transform-set ESP_AES128_SHA esp-aes esp-sha-hmac 
 mode tunnel
!
crypto ipsec profile ESP_3600_PFS-G2
 set security-association lifetime kilobytes disable
 set transform-set ESP_AES128_SHA  
 set pfs group2
!
interface Tunnel1
 ip address 169.254.1.1 255.255.255.252
 keepalive 10 3
 tunnel source GigabitEthernet1
 tunnel mode ipsec ipv4
 tunnel destination PUBLIC.IP.OF.REMOTE
 tunnel protection ipsec profile ESP_3600_PFS-G2
!
interface GigabitEthernet1
 ip address 10.10.10.10 255.255.255.0
 ip nat outside
 negotiation auto
 no mop enabled
 no mop sysid
!
ip route 0.0.0.0 0.0.0.0 10.10.10.1

I was surprised this worked.  Why?  Because the tunnel source is GigabitEthernet1’s private IP address of 10.10.10.10.  I would expect the other side to reject the proposal because it doesn’t match the public IP address with the isakmp key configured.

But looking closer, it’s actually  using NAT-T (udp port 4500):

csr1000v-1#show crypto session 

Interface: Tunnel1
Session status: UP-ACTIVE
Peer: PUBLIC.IP.OF.REMOTE port 4500 
IPSEC FLOW: permit ip 0.0.0.0/0.0.0.0 0.0.0.0/0.0.0.0 
Active SAs: 2, origin: crypto map


Importing SSL Certificate on FortiGate 90D

The instructions talk about importing via GUI, but lower end platforms like the F90D don’t have that option.

Instead, certificates must be imported via a copy/paste job in the CLI

FWF90D5318062277 # config vpn certificate local
FWF90D5318062277 (local) # edit MyNewCert
FWF90D5318062277 (MyNewCert) # set private-key "-----BEGIN RSA PRIVATE KEY-----..."
FWF90D5318062277 (MyNewCert) # set certificate "-----BEGIN CERTIFICATE-----..."
FWF90D5318062277 (MyNewCert) # end

The certificate can then be set in the GUI.

Cisco AnyConnect Client squashing other VPN client routes when there is split tunnel overlap

Consider a VPN client such as Palo Alto GlobalProtect doing split tunneling with an include access route of 10.4.0.0/16, 10.5.0.0/16, and 10.6.0.0/16.  The client route table in Windows looks like this, as expected:

C:\Users\harold>route print

IPv4 Route Table
=======================================================================
Active Routes:
Network Destination Netmask Gateway Interface Metric
10.4.0.0 255.255.0.0 On-link 10.4.1.205 1
10.5.0.0 255.255.0.0 On-link 10.4.1.205 1
10.6.0.0 255.255.0.0 On-link 10.4.1.205 1

The user then connects to a AnyConnect VPN with a split tunnel include of 10.0.0.0/8.  Something rather funny happens!

C:\Users\harold>route print

IPv4 Route Table
=======================================================================
Active Routes:
Network Destination Netmask Gateway Interface Metric
10.4.0.0 255.255.0.0 On-link 10.4.1.205 1
10.4.0.0 255.255.0.0 10.8.2.1 10.8.2.27 2
10.5.0.0 255.255.0.0 On-link 10.4.1.205 1
10.5.0.0 255.255.0.0 10.8.2.1 10.8.2.27 2
10.6.0.0 255.255.0.0 On-link 10.4.1.205 1
10.6.0.0 255.255.0.0 10.8.2.1 10.8.2.27 2

AnyConnect has created duplicate routes…for routes that don’t even belong to it.  But since the metric is a higher value (2 vs. 1) these routes are ignored by Windows.  So, no harm no foul I guess?

Different story on Mac though…hmmm


sadf


Disabling IPv6 and DNSSEC in Bind9 / Ubuntu 16.04

We recently migrated an internal bastion host from Ubuntu 14 to 16.04.  I was able to pull secondary zones, but getting recursion working was a real problem.  The previous one would forward certain zones to other internal servers, and even thought the configuration was the same I was having zero luck:

root@linux:/etc/bind# host test.mydomain.com 127.0.0.1
Using domain server:
Name: 127.0.0.1
Address: 127.0.0.1#53
Aliases:

Host test.mydomain.com not found: 2(SERVFAIL)

I did a tcpdump and discovered the queries were being sent to the intended forwarder just fine and valid IPs being returned:

19:11:24.180854 IP dns.cache-only.ip.46214 > dns.forwarder.ip.domain: 18136+% [1au] A? test.mydomain.com. (77)
19:11:24.181880 IP dns.forwarder.ip.domain > dns.cache-only.ip.46214: 18136 3/0/1 A 10.10.1.2, A 10.10.1.3 (125)

Grasping at straws, I theorized the two culprits could be IPv6 and DNSSec, some Googling indicated it’s a bit confusing on how to actually disable these, but I did find the answer.

Disabling IPv6 and DNSSEC

There were two steps to do this:

In /etc/default/bind9, add -4 to the OPTIONS variable

OPTIONS="-u bind -4"

In /etc/bind/named.conf.options do this

// Disable DNSSEC 
//dnssec-validation auto
dnssec-enable no;

// Disable IPv6
//listen-on-v6 { any; };
filter-aaaa-on-v4 yes;

After restarting BIND with sudo /etc/init.d/bind9 restart now we’re good:

root@linux:/etc/bind# host test.mydomain 127.0.0.1
Using domain server:
Name: 127.0.0.1
Address: 127.0.0.1#53
Aliases:

test.mydomain.com has address 10.10.1.2
test.mydomain.com has address 10.10.1.3

Authenticating ZenDesk via AWS SSO

Setting up ZenDesk for AWS SSO was a bit weird due to their requirements, but not that difficult in hindsight.

  1. Copy the SSO Sign-in and Sing-out URLs to ZenDesk.
  2. For the certificate fingerprint, download the AWS SSO certificate, open it, click Details tab, and look for Thumbprint at the bottom.
  3. The Application ACS URL will be https://MYSUBDOMAIN.zendesk.com/access/saml
  4. The Application SAML audience URL will be https://MYSUBDOMAIN.zendesk.com
  5. The final step is add two custom attributes in the AWS configuration
  • name = ${user:givenName}
  • email = ${user:email}

AWSSSO_ZenDesk_AttributeMappings

Verizon’s Connectivity in to AWS sucks, especially from California

I recently began using Amazon’s Northern California region as a Transit VPC / VPN hub – a bit pricier than the others, but certainly the best location for both our office and most of our remote users.  Everything worked great the first couple weeks, then I noticed heavy lag.  Initially I just assumed it to be our office Wifi since everything from home was fine, then realized our parent company had switched our internet service to Verizon (the artist formerly known Worldcom formerly known as MCI formerly known as UUNet formerly known as ALTER.NET)

While many ISPs such as Comcast and Level3 offered under 5ms latency from their Bay Area POPs to Amazon, Verizon’s was 10 times higher.

verizon_aws-ncalifornia-sanjose.png

From Los Angeles, it’s even worse.  One would expect around 20ms.  Instead, you get over 90ms of latency before even leaving Verizon’s network.  If the reverse DNS is correct and that’s truly only gigabit link…shame, shame, shame…

verizon_aws-ncalifornia-losangeles

Hard to say exactly what’s going on here, but noticed the only POP with the expected latency Ashburn, VA at around 70ms.  In Dallas Verizon was about 60ms while competitors were 50ms.  My guess here is Verizon partially backhauls their connectivity to AWS through some central point(s), likely Virginia and somewhere near Texas.

Palo Alto GlobalProtect Portal login: A valid client certificate is required

Came across this while rolling about Palo Alto GlobalProtect.  The knowledge base article suggests installing the cert in the browser’s store, which isn’t really helpful in understanding what the cause or solution was in my case.

GPPortalValidClientCertificateIsRequired

There’s also its cousin, which complains about a missing client certificate when connecting to the Gateway:

GP_requiredClientCertNotFound

The problem lies in the Certificate profile configuration.  I had understood this to be a way to chain intermediate certs; in fact, that happens automatically when the certificate is upload.  Rather, this setting controls the CA for client side certs.  If if you’re not using client side certs, the configuration should simply have Certificate Profile left to “None”

GPPortalAuthentication