Automating Push/Pulls to GitHub via SSH

Normally a git clone would be via HTTPS, with prompts for GitHub credentials:

$ git clone https://github.com/MyOrg/MyRepo.git

To automate GitHub pull/push requests, need to use SSH w/ key authentication.

Start by setting up a ~/.gitconfig file and specify your primary GitHub e-mail address:

[core]
 editor = nano
[user]
 name = Johnny Five
 email = johnny5@shortcircuit.com

Upload the SSH public key to GitHub.  This will be ~/.ssh/id_rsa.pub by default.  To specify a different private key for GitHub,  add an entry in ~/.ssh/config like this:

Hostname github.com
User git
IdentityFile ~/.ssh/mySpecialGitHubKey.pem

Then do clone via SSH.  Note “git” should be username, not GitHub username.

$ git clone ssh://git@github.com/MyOrg/MyRepo.git

Installing F5 Images and Hotfixes on BigIP-VE

Often with the Bigip-VEs, installing an image or hotfix via the GUI will be impossible because the volume drop-down menu is empty:

F5GUInoVolumes

First verify the name of the image that’s been uploaded.  It should be in /shared/images

(tmos)# bash
# ls -l /shared/images/*.iso
-rw-r--r--. 1 tomcat tomcat 2096115712 2020-03-11 09:56 /shared/images/BIGIP-13.1.1.4-0.0.4.iso

Then install the image via tmsh with the create-volume option:

# tmsh

(tmos)# install sys software image BIGIP-13.1.1.4-0.0.4.iso volume HD1.2 create-volume

(tmos)# show sys software status
----------------------------------------------------------------
Sys::Software Status
Volume Product Version Build Active Status
----------------------------------------------------------------
HD1.1    BIG-IP  13.1.0.8  0.0.1     yes               complete
HD1.2    BIG-IP  13.1.1.4  0.0.4      no  installing 10.000 pct

At this point you can go back to GUI, watch the installation complete, and boot to that volume.

Hyper-V NIC Teaming with LACP

Tricky finding where to set this, but was worth the effort.

In Server Manager, look under Hyper-V, right click and Configure NIC teaming.

hyperV_nicteaming

Create a new team and expand properties at the bottom

hyperV_nicteaming_LACP

In Hyper-V manager, open Virtual Switch Manager, Create Virtual Switch.  Select the NIC team.  If trunking will be used, set the VLAN ID.

hyperV_vSwitch.png


Internal NICs on UCS E-Series Servers

General rules:

  1. The router’s ‘ucse1/0/0 + ucse1/0/1’ ports will map to GE0 and GE1 on the blade
  2. Bridging must be used to join the physical interfaces to the same broadcast domain
  3. Separate bridges must be used for each VLAN
  4. To use a native vlan, use “encapsulation untagged”

In our case we wanted to use tagging in the connection to the switch, but put the blade’s GE0 and GE1 interfaces on vlan 123 without tagging:

bridge-domain 123
!
interface Port-channel1
 no ip address
 no negotiation auto
 service instance 123 ethernet
 encapsulation dot1q 123
 rewrite ingress tag pop 1 symmetric
 snmp ifindex persist
 bridge-domain 123
 !
interface GigabitEthernet0/0/1
 description Switch:1
 no ip address
 negotiation auto
 channel-group 1 mode active
interface GigabitEthernet0/0/2
 description Switch:2
 no ip address
 negotiation auto
 channel-group 1 mode active
!
interface ucse1/0/0
 description UCS E-Series Blade:GE0
 no ip address
 no negotiation auto
 switchport mode trunk
 service instance 123 ethernet
 encapsulation untagged
 bridge-domain 123
 !
interface ucse1/0/1
 description UCS E-Series Blade:GE1
 no ip address
 no negotiation auto
 switchport mode trunk
 service instance 123 ethernet
 encapsulation untagged
 bridge-domain 123
 !


Upgrading Cacti from 0.8.8 to 1.0.6

Not too painful.  Cacti 1.x requires a few PHP modules that the legacy versions did not.  This was an easy fix in CentOS:

# yum install php-ldap
# yum install php-posix
# yum install php-mbstring
# apachectl restart

The next trick was on the database side.  I’d been using a MySQL / MariaDB 5.5 server hosted on a QNAP.  It looks like the installation script was reading the local /etc/my.cnf file to get tuning parameters, and complaining about several settings.  I ignored the warnings and proceeded.

The database upgrade took several seconds, but did complete.  However, upon login in via web, some pages were loading incomplete.  Fix was to reset the Server Base URL setting, since without it, the CSSes weren’t referenced properly.

cacti_server_base_url.png

That’s it.  Good to see Cacti finally on the 1.0 side of things

Cacti Template: Temperature on Cisco ISR 4000 / ASR 1000

4351_temp

Our new Cisco ISR 4351s are deployed in a small closet with basic AC and not the best circulation,so  I wanted to make sure temperature was being trended in Cacti.

https://www.hightail.com/download/dDZHZEU2U1BoeWJMYnRVag

Finding the newer SNMP OIDs was a challenge but here they are:

$ snmpwalk -v 2c -c public isr.mydomain.com 1.3.6.1.2.1.47.1.1.1.1.2
iso.3.6.1.2.1.47.1.1.1.1.2.4 = STRING: "Temp: Temp 1"
iso.3.6.1.2.1.47.1.1.1.1.2.5 = STRING: "Temp: Temp 2"
iso.3.6.1.2.1.47.1.1.1.1.2.6 = STRING: "Temp: Temp 3"
iso.3.6.1.2.1.47.1.1.1.1.2.7001 = STRING: "Temp: Inlet 1"
iso.3.6.1.2.1.47.1.1.1.1.2.7002 = STRING: "Temp: Inlet 2"
iso.3.6.1.2.1.47.1.1.1.1.2.7003 = STRING: "Temp: Outlet 1"
iso.3.6.1.2.1.47.1.1.1.1.2.7004 = STRING: "Temp: Outlet 2"
iso.3.6.1.2.1.47.1.1.1.1.2.7005 = STRING: "Temp: CPU"
$ snmpwalk -v 2c -c public isr.mydomain.com 1.3.6.1.4.1.9.9.91.1.1.1.1.4
SNMPv2-SMI::enterprises.9.9.91.1.1.1.1.4.4 = INTEGER: 45
SNMPv2-SMI::enterprises.9.9.91.1.1.1.1.4.5 = INTEGER: 35
SNMPv2-SMI::enterprises.9.9.91.1.1.1.1.4.6 = INTEGER: 38
SNMPv2-SMI::enterprises.9.9.91.1.1.1.1.4.7001 = INTEGER: 33
SNMPv2-SMI::enterprises.9.9.91.1.1.1.1.4.7002 = INTEGER: 30
SNMPv2-SMI::enterprises.9.9.91.1.1.1.1.4.7003 = INTEGER: 37
SNMPv2-SMI::enterprises.9.9.91.1.1.1.1.4.7004 = INTEGER: 32
SNMPv2-SMI::enterprises.9.9.91.1.1.1.1.4.7005 = INTEGER: 36

The OIDs should be the same for the ASR 1000 series.  Since we’ll be replacing our 6504s likely with an ASR 1001-x pair this year, I’ll circle back and verify.

Activating Throughput License on 4351 (FL-44-PERF-K9)

Time to replace the office 2951s with 4351s.  Since the Internet pipes are 300 Mbps, we purchased the FL-44-PERF-K9 upgrades, which bump the throughput from a 200 Mbps to 400 Mbps cap.  I entered the PAK on the Cisco License Portal, installed the license, but noticed upon testing there was still a 200 Mbps limit.  The license commands indicated that the license had been installed, but not enabled/activated.

Router#show license feature 
Feature name Enforcement Evaluation Subscription Enabled RightToUse 
appxk9 yes yes no no yes 
uck9 yes yes no no yes 
securityk9 yes yes no no yes 
ipbasek9 no no no yes no 
FoundationSuiteK9 yes yes no no yes 
AdvUCSuiteK9 yes yes no no yes 
cme-srst yes yes no no yes 
hseck9 yes no no no no 
throughput yes yes no no yes 
internal_service yes no no no no

The licensing magic trick? Configure the platform to jump from 200 Mbps to 400 Mbps:

Router(config)#platform hardware throughput level 400000 
% The config will take effect on next reboot

Upon rebooting, NOW the throughput license is enabled.

Router#sh license feature
Feature name Enforcement Evaluation Subscription Enabled RightToUse 
throughput yes yes no yes yes

Router#show platform hardware throughput level 
The current throughput level is 400000 kb/s

F5 LTM: Working with Data Groups via TMSH

As my data group lists get larger and larger, I’ve needed to step away from the GUI to manage them.  API will be used eventually but for now TMSH will be the quick and dirty method of managing and verifying entries.

Note: Modifying data-groups via TMSH requires Administrator privileges.

modify ltm data-group internal fruits records add {“orange”}

To add multiple entries at once, just separate via comma:

modify ltm data-group internal fruits records add {“apple” “pear”}

To enter name value pairs, put the Value in another set of curly braces:

modify ltm data-group internal fruits records add { “banana” { data “yellow”} }

To add a value to a pre-existing key:

modify ltm data-group internal fruits records modify { "orange" { data "orange" }}

Delete a key:

modify ltm data-group internal fruits records delete {"pear"}

Now to list the values:

list ltm data-group internal fruits

Fixing expired SSL certificate on F5 GTM

I applied the latest Hotfix to our GTMs tonight and was checking logs just to verify there were no surprises.  Unfortunately, there were: /var/log/gtm was showing SSL errors every 10 seconds complaining of being unable to verify the certificates.  I check the self-sign certs, and sure enough, the had expired a few days ago.

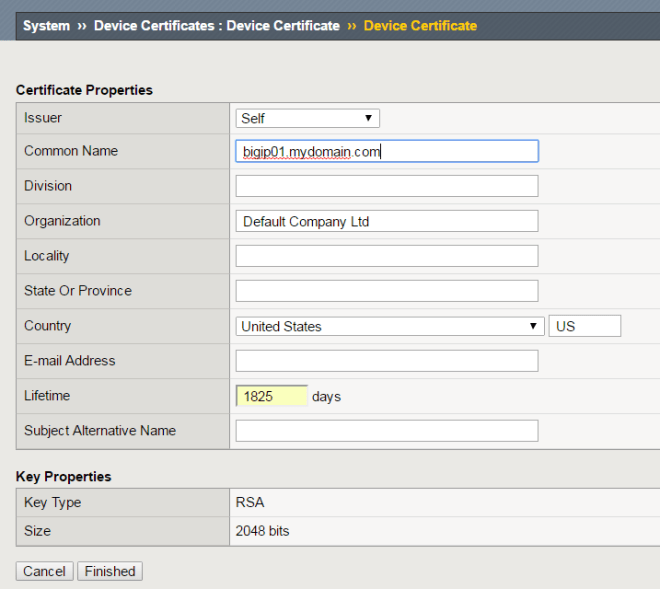
The first step to fix is obvious – renew the cert via System -> Device Certificate -> Device Certificate.  The only field that really matters here is hostname and duration; everything else can be left to defaults.

bigip_device_certificate_renew

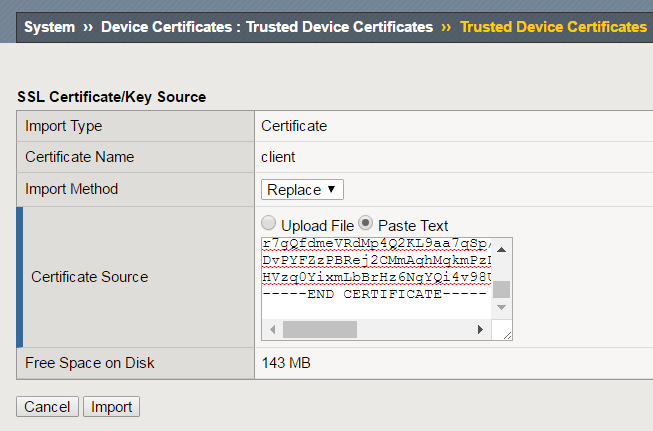
Now re-import each others new certificates System -> Device Certificate -> Trusted Device certificates.

bigip_trusted_device_certificate_import

Sync and failover between the BigIP devices is now fixed, buuuuuut the logs show that gtmd is still not happy:

Feb 21 18:07:20 bigip01 notice gtmd[13701]: 011ae020:5: Connection in progress to 192.168.1.2 
Feb 21 18:07:20 bigip01 notice gtmd[13701]: 011ae01c:5: Connection complete to 192.168.1.2. Starting SSL handshake
Feb 21 18:07:20 bigip01 iqmgmt_ssl_connect: SSL error:14090086:SSL routines:SSL3_GET_SERVER_CERTIFICATE:certificate verify failed
Feb 21 18:07:20 bigip01 err gtmd[13701]: 011ae0fa:3: iqmgmt_ssl_connect: SSL error: error:14090086:SSL routines:SSL3_GET_SERVER_CERTIFICATE:certificate verify failed (336134278)

This is happening on the secondary as well:

Feb 21 18:20:26 bigip02 iqmgmt_ssl_connect: SSL error:14090086:SSL routines:SSL3_GET_SERVER_CERTIFICATE:certificate verify failed
Feb 21 18:20:26 bigip02 err gtmd[13788]: 011ae0fa:3: iqmgmt_ssl_connect: SSL error: error:14090086:SSL routines:SSL3_GET_SERVER_CERTIFICATE:certificate verify failed (336134278)

As you may have guessed, GTM needs a separate step to pick up the cert changes.  The solution is here is not all that obvious – run bigip_add on both systems to copy the certs via SSH and dump them in to /config/gtm/server.crt.  Before doing it, keep in mind there’s two requirements for this command to succeed:

  1. The Self IP must be permit SSH.  Since this is a one-time exchange, you can use management IPs even if the GTM server IP is something different.   For non-management IPs, “Port Lockdown: Allow All” should be set.
  2. The user must be set to use Advanced Shell aka BASH (not tmsh).  The simplest way to override this to login as ‘root’, since it’s a pre-defined user that is inherently set for Advanced Shell
[admin@bigip01:Active:In Sync] ~ # bigip_add root@10.1.1.2
Retrieving remote and installing local BIG-IP's SSL certs ...
Enter root password for 10.1.1.2 if prompted
==> Done <==

[admin@bigip02:Active:In Sync] ~ # bigip_add root@10.1.1.1
Retrieving remote and installing local BIG-IP's SSL certs ...
Enter root password for 10.1.1.1 if prompted
==> Done <==

Boom!  GTM is now happy now and I can go home.

Feb 21 18:25:11 bigip01 alert gtmd[13701]: 011a500b:1: SNMP_TRAP: Box 192.168.1.2 state change blue --> green
Feb 21 18:26:16 bigip02 alert gtmd[13788]: 011a500b:1: SNMP_TRAP: Box 192.168.1.1 state change blue --> green


Wireless AP with Expired Certificate


Wanted to use an old 1242 AP in my garage, where 802.11n isn’t a concern.  Unfortunately even after doing a factory reset, I could not get it to join the controller.  Console logs showed this repeating every minute:

*Feb 2 18:13:54.000: %CAPWAP-5-DTLSREQSEND: DTLS connection request sent peer_ip: 10.0.0.11 peer_port: 5246
*Feb 2 18:13:54.001: %CAPWAP-5-CHANGED: CAPWAP changed state to 
*Feb 2 18:13:55.303: %DTLS-5-ALERT: Received FATAL : Certificate unknown alert from 10.0.0.11
*Feb 2 18:13:55.303: %CAPWAP-3-ERRORLOG: Bad certificate alert received from peer.
*Feb 2 18:13:55.304: %DTLS-5-PEER_DISCONNECT: Peer 10.0.0.11 has closed connection.
*Feb 2 18:13:55.304: %DTLS-5-SEND_ALERT: Send FATAL : Close not

Googling the error messages pointed to the AP trying to join with an expired certificate.  Sure enough, this was definitely the problem…by about 4 years.

AP0019.e832.0320#show crypto pki certificates 
CA Certificate
 Status: Available
 Certificate Serial Number: 00
 Certificate Usage: General Purpose
 Issuer: 
 ea=support@airespace.com
 cn=ca
 ou=none
 o=airespace Inc
 l=San Jose
 st=California
 c=US
 Subject: 
 ea=support@airespace.com
 cn=ca
 ou=none
 o=airespace Inc
 l=San Jose
 st=California
 c=US
 Validity Date: 
 start date: 23:38:55 UTC Feb 12 2003
 end date: 23:38:55 UTC Nov 11 2012

The quick and dirty solution was to set the WLC (2106 w/ 7.0.252.0) to ignore this:

(Cisco Controller) >config ap lifetime-check mic enable
(Cisco Controller) >config ap lifetime-check ssc enable