Activating Throughput License on 4351 (FL-44-PERF-K9)

Time to replace the office 2951s with 4351s.  Since the Internet pipes are 300 Mbps, we purchased the FL-44-PERF-K9 upgrades, which bump the throughput from a 200 Mbps to 400 Mbps cap.  I entered the PAK on the Cisco License Portal, installed the license, but noticed upon testing there was still a 200 Mbps limit.  The license commands indicated that the license had been installed, but not enabled/activated.

Router#show license feature 
Feature name Enforcement Evaluation Subscription Enabled RightToUse 
appxk9 yes yes no no yes 
uck9 yes yes no no yes 
securityk9 yes yes no no yes 
ipbasek9 no no no yes no 
FoundationSuiteK9 yes yes no no yes 
AdvUCSuiteK9 yes yes no no yes 
cme-srst yes yes no no yes 
hseck9 yes no no no no 
throughput yes yes no no yes 
internal_service yes no no no no

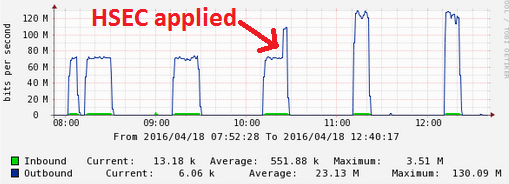
The licensing magic trick? Configure the platform to jump from 200 Mbps to 400 Mbps:

Router(config)#platform hardware throughput level 400000 
% The config will take effect on next reboot

Upon rebooting, NOW the throughput license is enabled.

Router#sh license feature
Feature name Enforcement Evaluation Subscription Enabled RightToUse 
throughput yes yes no yes yes

Router#show platform hardware throughput level 
The current throughput level is 400000 kb/s

Wireless AP with Expired Certificate


Wanted to use an old 1242 AP in my garage, where 802.11n isn’t a concern.  Unfortunately even after doing a factory reset, I could not get it to join the controller.  Console logs showed this repeating every minute:

*Feb 2 18:13:54.000: %CAPWAP-5-DTLSREQSEND: DTLS connection request sent peer_ip: 10.0.0.11 peer_port: 5246
*Feb 2 18:13:54.001: %CAPWAP-5-CHANGED: CAPWAP changed state to 
*Feb 2 18:13:55.303: %DTLS-5-ALERT: Received FATAL : Certificate unknown alert from 10.0.0.11
*Feb 2 18:13:55.303: %CAPWAP-3-ERRORLOG: Bad certificate alert received from peer.
*Feb 2 18:13:55.304: %DTLS-5-PEER_DISCONNECT: Peer 10.0.0.11 has closed connection.
*Feb 2 18:13:55.304: %DTLS-5-SEND_ALERT: Send FATAL : Close not

Googling the error messages pointed to the AP trying to join with an expired certificate.  Sure enough, this was definitely the problem…by about 4 years.

AP0019.e832.0320#show crypto pki certificates 
CA Certificate
 Status: Available
 Certificate Serial Number: 00
 Certificate Usage: General Purpose
 Issuer: 
 ea=support@airespace.com
 cn=ca
 ou=none
 o=airespace Inc
 l=San Jose
 st=California
 c=US
 Subject: 
 ea=support@airespace.com
 cn=ca
 ou=none
 o=airespace Inc
 l=San Jose
 st=California
 c=US
 Validity Date: 
 start date: 23:38:55 UTC Feb 12 2003
 end date: 23:38:55 UTC Nov 11 2012

The quick and dirty solution was to set the WLC (2106 w/ 7.0.252.0) to ignore this:

(Cisco Controller) >config ap lifetime-check mic enable
(Cisco Controller) >config ap lifetime-check ssc enable

Fixing stuck UCS-E Server

I purchased a UCS-E140DP-M1 blade off eBay for $900 so we could throw it in one of our ISR G2s and play with it.  It powered on fine, and the first step was to get the firmware upgraded.  The CIMC went from 1.0 to 2.4.1 no problem, but upon taking it to 3.1.3, the blade would not boot.  Seemed to be stuck at the BIOS prompt..

ucse_bios_stuck

My theory right away was an incompatibility between the CIMC and the BIOS.  The original BIOS version shipped was 4.6.4.8, but the newer versions were lower, indicating something major had changed.  I attempted multiple times to to upgrade the BIOS to the versions matching CIMC 1.0.2, 2.4.1, and 2.5.0.3, but would always get some error message.  Common output looked like this:

Router#ucse subslot 2/0 session imc 
Trying 10.10.10.10, 2131 ... Open
Username: admin
Password: 
E140DP-FOC16490HEF# scope bios
E140DP-FOC16490HEF /bios # show detail
BIOS:
    BIOS Version: 4.6.4.8
    Boot Order: CDROM:Virtual-CD
    FW Update/Recovery Status: Error, Update invalid
    Active BIOS: backup

After downgrading the CIMC back to 2.4.1, I was copy and map huu-2.4.1.iso, follow the wizards, and then upgrade the BIOS.  This looked much better.

E140DP-FOC16490HEF /bios # show detail
BIOS:
    BIOS Version: "UCSED.1.5.0.2 (Build Date: 05/15/2013)"
    Boot Order: CDROM:Virtual-CD
    FW Update/Recovery Status: Done, OK
    Active BIOS on next reboot: main

So long story short – use the HUU to do all firmware updates, so the CIMC and BIOS firmware versions are in sync.

SSH Cipher Updates in Cisco ASA 9.4(3)12

After upgrading our Cisco ASAs from 9.4(3)11 to 9.4(3)12, Rancid could no longer log in.  Debugging by manually running clogin, the problem was clear: incompatibility with SSH ciphers.  Rancid wanted to use 3DES (“Triple DES”), but the ASA only supported AES.

rancid@localhost:~$ clogin ciscoasa.mydomain.com
ciscoasa.mydomain.com
spawn ssh -c 3des -x -l rancid ciscoasa.mydomain.com
no matching cipher found: client 3des-cbc server aes128-cbc,aes192-cbc,aes256-cbc,aes128-ctr,aes192-ctr,aes256-ctr

By default, the ASA’s SSH server uses the “medium” cipher list.  Sure enough, 3DES is no longer in the list:

ciscoasa/pri/act# show ssh ciphers 
Available SSH Encryption and Integrity Algorithms
Encryption Algorithms:
  low: 3des-cbc aes128-cbc aes192-cbc aes256-cbc aes128-ctr aes192-ctr aes256-ctr 
  medium: aes128-cbc aes192-cbc aes256-cbc aes128-ctr aes192-ctr aes256-ctr
  fips: aes128-cbc aes256-cbc  
  high: aes256-cbc aes256-ctr 

A quick and dirty work-around: configure the ASA to use the “low” cipher list.  However, since it’s time to start phasing out 3DES anyway (it’s from the 90s), I instead wanted to tell Rancid to prefer AES and only use 3DES as a last resort.  The first step was finding the possible cipher names, which were in /etc/ssh/ssh_config:

# Ciphers aes128-ctr,aes192-ctr,aes256-ctr,arcfour256,arcfour128,aes128-cbc,3des-cbc

I simplified this a bit and added this line to Rancid’s .cloginrc:

add cyphertype * aes128-ctr,aes128-cbc,3des-cbc

This preference matches most of my devices since AES-CTR is supported in IOS 15 and is preferred over AES-CBC and 3DES.  Good enough for me.

Using 1 Gbps Fiber SFPs on a Cisco 6500 supervisor

After numerous headache with our Cisco 2921 routers and the RPS, I decided it was time to bring a 6503 back from the dead to handle the edge routing in our office.  One problem though, I couldn’t get our friggin’ AT&T fiber connection moved to the 6503, even reusing the same cable and SFP.  Port Gi1/1 on the SUP720-3BXL was configured with the exact same information as the 2921, yet the link would not come up.

I swapped the GLC-LH-SM for a SFP-GE-L, which is the fancier version that supports DOM (Digital Optical Monitoring).  This showed the signal was fine, indicating the SFP and cable were not the issue:

Switch#sh int gi1/1 transceiver 
Gi1/1 29.7 3.29 6.1 -7.1 -6.4 

After several days of head scratching, a Reddit user saved my butt and pointed me to the problem.  For whatever reason, disabling speed negotiation fixes everything.  This makes no sense since a fiber SFP would only support 1000/full, but I gave it a shot and disabled speed negotiation entirely.

interface GigabitEthernet1/1
 description AT&T 500Mb Internet
 bandwidth 500000
 ip address 12.34.56.178 255.255.255.252
 no ip redirects
 load-interval 30
 speed nonegotiate
 no lldp transmit
 no cdp enable

Upon adding that, link light came on and interface was up/up.  Yet another entry for the Cisco gotcha hall of fame.

How many 3750-E switches can an RPS 2300 backup?

The Q&A sheet mentions that with dual 1150W power supplies, an RPS can backup 1 or 2 3750-E switches.  This is assuming the switches also have 1150W power supplies installed.

But what if they’re only using 750W?  The RPS would have a total of 2300W of power, while three of the switches would only require 2250W.    So it should be able to backup three switches, right?

Nope.  You can only backup two.  So, there’s actually really no point of installing 1150W power supplies in the RPS.

Switch#show env rps
DCOut State Connected Priority BackingUp WillBackup Portname SW#
----- ------- --------- -------- --------- ---------- --------------- ---
 1 Active Yes 6 Yes Yes FDO1525Y1T5 1
 2 Active No 6 No No <> -
 3 Active Yes 6 Yes Yes FDO1417R07E 3
 4 Active No 6 No No <> -
 5 Active Yes 6 No No FDO1406R1KU 5
 6 Active No 6 No No <> -

Yet another reason why the RPS sucks and StackPower on the 3750X and 3850 series is so much better.

DNS Resolution via VRF on Cisco IOS

For several years I’ve been using VRFs for all management functions.  This greatly improves security since all management functions can be locked down to a certain interface, and also recover-ability in the even of routing problems.  The downside I keep finding is certain things either don’t work, or require special work-rounds. Case in point: DNS resolution.

Per Cisco, VRF-aware DNS functionality has been supported for quite a while.  However, I’m completely stumped on how to actually use it.  Sample config on an 2921 router running IOS 15.5(3)M4:

ip vrf Mgmt-intf
 rd 12345:123
!
ip domain-lookup 
ip domain list vrf Mgmt-intf mydomain.com
ip name-server vrf Mgmt-intf 10.20.30.40

!
interface Port-channel1.123
 encapsulation dot1Q 123
 ip vrf forwarding Mgmt-intf
 ip address 10.20.30.100 255.255.255.0
!
ip domain-lookup vrf Mgmt-intf source-interface po1.123

Still no joy.  Really seems there was a goof here in enabling this feature.  I’ll complain to Cisco and hopefully it will be fixed by the time I die.

Commands to Restore Cisco ACS from backup

We’re still running ACS 5.4 patch 4, which was always buggy, but has gotten especially painful to manage via modern browsers.  Over the last few weeks I’ve realized this has now gone to catastrophic.  If editing a policy with say FireFox 49, trying to make a change will cause the entire policy to be deleted without being prompted.  It’s definitely time to patch, but in the meantime I needed to restore from backup.  So I SSH in to ACS, find last night’s backup file, and go to restore:

acs01/admin# restore acs01-backup-161004-0000.tar.gpg repository MyFTP  application acs 
Restore may require a restart of application services. Continue? (yes/no) [yes] ? yes
Initiating restore.  Please wait...
Backup file does not match installed application
% Application restore failed

Hmm….the application name is ‘acs’.  Maybe I have to put it in UPPER case?!?

acs01/admin# restore acs01-backup-161004-0000.tar.gpg repository MyFTP application ACS
Restore may require a restart of application services. Continue? (yes/no) [yes] ? yes
Initiating restore.  Please wait...
Calculating disk size for /opt/backup/restore-acs01-backup-161004-0000.tar.gpg-1475607189
Total size of restore files are 331 M.
Max Size defined for restore files are 105573 M.
% Backup file does not match installed application(s)

OK, now I’m concerned.  Wait – leave it to Cisco to throw a gotcha.  The “restore” command restores both ACS and the appliance OS.  To restore just ACS configuration, use the “acs restore command”:

acs01/admin# acs restore acs01-backup-161004-0000.tar.gpg repository MyFTP
Restore requires a restart of ACS services. Continue?  (yes/no) yes
Initiating restore.  Please wait...

Bingo!  And a few minutes later, everything is happy.  I logged in using IE8 and was able to make the policy changes without issue.

Cisco 2921 Router with HSEC License

cerm

After replacing our 2821 routers with 2921s, I encountered a dilemma.   The 2821s were used to terminate Site to Site IPSec tunnels to AWS, and thanks to offloading crypto operations in their AIM-VPN/SSL-2 modules, could easily push 120 Mbps of traffic.  Not quite so with the 2921s, as I immediately started seeing a whole lot of these:

%CERM-4-RX_BW_LIMIT: Maximum Rx Bandwidth limit of 85000 Kbps reached for Crypto functionality with securityk9 technology package license.
%CERM-4-TX_BW_LIMIT: Maximum Tx Bandwidth limit of 85000 Kbps reached for Crypto functionality with securityk9 technology package license

As it turns out, there’s a 85 Mpbs software rate limiter due to Crypto export restrictions.

Router# show platform cerm-information
Crypto Export Restrictions Manager(CERM) Information:
 CERM functionality: ENABLED

----------------------------------------------------------------
 Resource Maximum Limit Available
 ----------------------------------------------------------------
 Tx Bandwidth(in kbps) 85000 85000
 Rx Bandwidth(in kbps) 85000 85000

Since one of the tunnels carries a replication job that needs to complete within an hour, I needed to match if not exceed what the 2821s had been doing.  The dilemma then was to purchase an L-FL-29-HSEC-29 license which would remove the rate limiter, or simply scrap them in favor of a new 4331 or 4351 router.  The decision really hinged on how much throughput a 2921 with HSEC license would deliver.  After not finding anything on the Googles or Cisco Forums, I turned to Reddit and was pointed to two links.

First was the ISR G2 performance whitepaper from Cisco, which gave an IPSec max throughput of 207 Mbps.  This seemed a bit high to me, and was confusing because it did not state whether this was bi-directional or one-way.

Second was a Miercom Report listing values of 70 Mbps for the 2911 and 150 Mbps of the 2951 respectively.  Since the 2921 is closer in terms of hardware to the 2951 but with 20% less horsepower, I ballparked 125 Mbps for the 2921.

Our reseller had quoted $780 for an HSEC license, but after poking around eBay I found someone willing to sell for $200/each.  Sold!  They were applied this morning.

hsec_throughput

I was a bit surprised to see the CPU is still well short of 100%.  Would guess that the bottleneck is either on the remote side, or at the sever level.

hsec_cpu

So doing the math, 130 Mbps / (1/.78) = 166.66 Mbps. I found it amusing that this was exactly halfway between the estimates of 125 and 207 Mpbs.

NAT Hairpinning on Cisco ISR

I’ve never had a need to do NAT hairpinning on a Cisco ISR, as I’d typically have a fancy firewall like an ASA doing the work.  However, with this blog now hosted on a NAS inside my home network, I’ve found it necessary to support it.  Hairpinning essentially means the internal server is available via the public (global) IP address, even when coming from the private (local) network.  I didn’t want to forge DNS entries because it’s a pain to manage, and, well, it’s just wrong.

First, here’s my traditional NAT configuration.  Fa0/0 is the public interface connected to the ISP.  BVI is the Layer 3 private interface.

interface FastEthernet0/0
 ip address dhcp
 ip nat outside
!
interface Vlan1
 no ip address
 bridge-group 1
!
interface BVI1
 ip address 192.168.0.1 255.255.255.0
 ip nat inside
!
ip nat inside source list NATLIST interface FastEthernet0/0 overload
ip nat inside source static tcp 192.168.0.100 80 interface FastEthernet0/0 80
!
ip access-list extended NATLIST
 deny ip any 10.0.0.0 0.255.255.255
 deny ip any 172.16.0.0 0.15.255.255
 deny ip any 192.168.0.0 0.0.255.255
 permit ip any any
!
bridge 1 protocol ieee
bridge 1 route ip

Now the new config.  Pretty simple, but there’s a gotcha: the requirement for no ip redirects on both outside and inside interfaces.

interface FastEthernet0/0
 ip address dhcp
 no ip redirects
 ip nat enable
!
interface BVI1
 ip address 192.168.0.1 255.255.255.0
 no ip redirects
 ip nat enable
!
ip nat source list NATLIST interface FastEthernet0/0 overload
ip nat source static tcp 192.168.0.100 80 interface FastEthernet0/0 80

And here comes the gotcha: performance.  After switching to this configuration, my throughput over NAT went from about 90 Mbps to 15 Mbps.  Ouch.  Saw these numbers both on a 2811 and 1841.