One of the many stupid things for the CheckPoint CloudGuard IaaS appliances in GCP is Checkpoint never took in to account scenarios where multiple clusters exist within the same project and/or same network. This results in a naming conflict for the static routes & access config, and the default behavior will be for different clusters to “steal” routes IP addresses from the others.
To fix this, the first step is give each cluster a unique name. This can be fairly easily done by setting CHKP_TAG in the Python script $FWDIR/scripts/gcp_had.py
CHKP_TAG = cluster-1
This variable influences the route and access config names. But that still won’t be enough, because their deployment script hard-codes the access config name, so failover still won’t work. You’ll see this in $FWDIR/log/gcp_had.elg during a failover event:
2024-03-28 23:09:44,259-GCP-CP-HA-ERROR- Operation deleteAccessConfig for https://www.googleapis.com/compute/v1/projects/project-1234/zones/us-west2-b/instances/checkpoint-member-b error OrderedDict([('errors', [OrderedDict([('code', 'INVALID_USAGE'), ('message', 'Invalid access config name `checkpoint-access-config` as the access config name in instance is `x-chkp-access-config`.')])])])
To fix this, the existing access config names must be manually deleted on both members:
Finally got some time to start exploring the CheckPoint management server’s API via web. As with most vendors, the tricky part was understanding the required steps for access and making basic calls. Here’s a quick walk-through.
Getting Management API Access
By default, access is only permitted from the Management server itself. To change this, do the following:
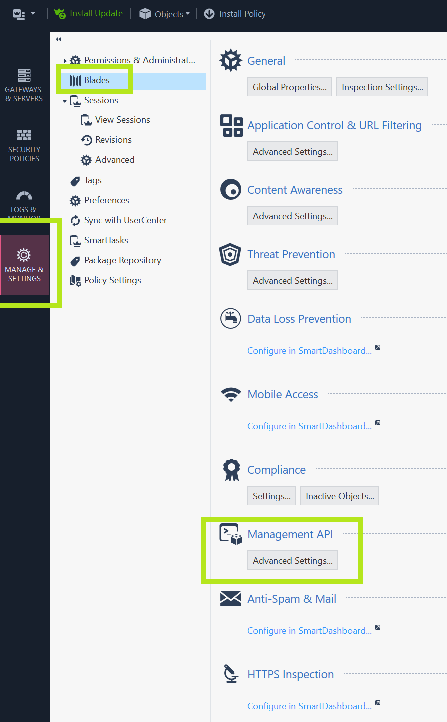
In SmartConsole, navigate to Manage & Settings -> Blades -> Management API
2. Change this to “All IP Addresses that can used by GUI clients” or simply “All IP Addresses”.
3. Click OK. You’ll see a message about restarting API
4. Click the the “Publish” button at the top
5. SSH to the Management Server and enter expert mode. Then enter this command:
api restart
6. After the restart is complete, use the command api status to verify the accessibility is no longer “Require Local”
[Expert@chkp-mgmt-server:0]# api status

API Settings:
---------------------
Accessibility:                      Require all granted
Automatic Start:                    Enabled
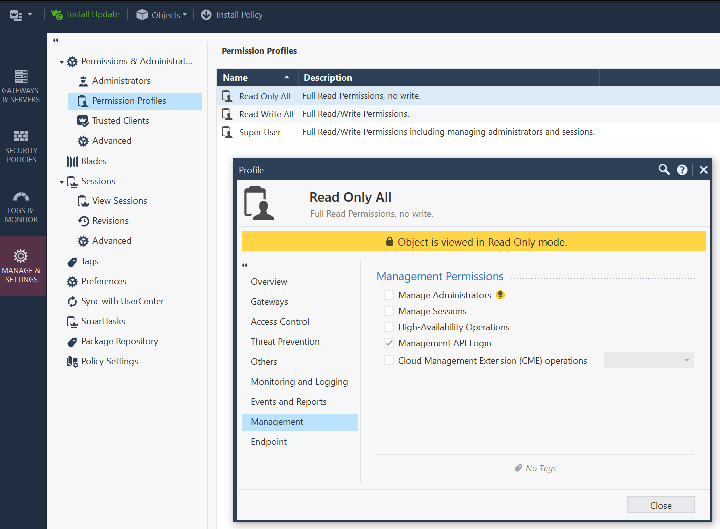
Verifying API Permissions
While in Smart Console , also verify that your account and permission profile has API login access by examining the Permission profile and look under the “Management” tab. This should be true by default.
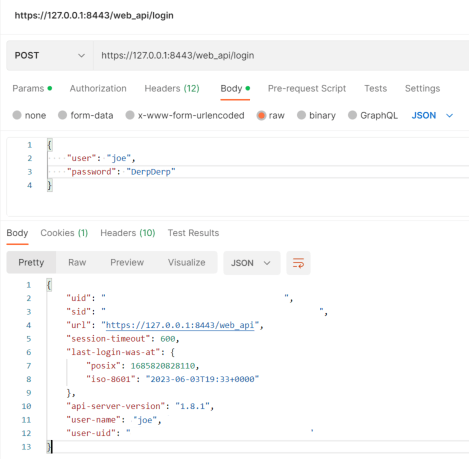
Generating a Session Token
Now we’re ready to hit the API. First step generally is do a POST to /web_api/login to get a SID (session token). There are two required parameters: ‘user’ and ‘password’. Here’s a postman example. Note the parameters are raw JSON in the body (not the headers):
Making an actual API Call
With the SID obtained, we can copy/paste it and start sending some actual requests. There’s a few things to keep in mind
The requests are always POST, even if retrieving data
Two headers must be included: X-chkp-sid (which is the sid generated above) and Content-Type (which should be ‘application/json’)
All other parameters are set in the body. If no parameters are required, the body must be an empty object ({})
Here’s another Postman example getting the a list of all Star VPN Communities:
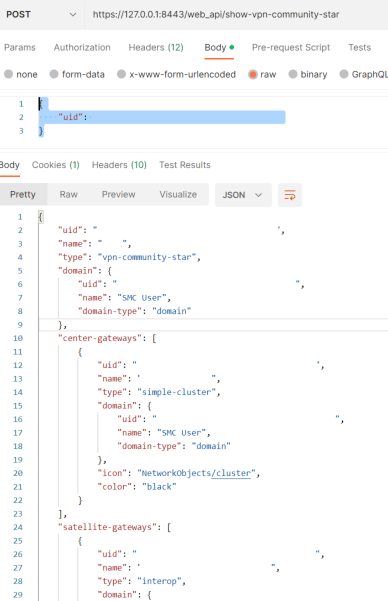
Retrieving details on specific objects
To get full details for a specific object, we have to specify the name or uuid in the POST body. For example, to get more information about a specific VPN community, make a request to /web_api/show-vpn-community-star with this:
{
    "uid": "fe5a4339-ff15-4d91-bfa2-xxxxxxxxxx"
}
You’ll get back an object (aka python dictionary) back.
I desperately need to get some graphs on connections for Checkpoint after being unable to activate the monitoring blade for a cloud deployment with a PAYG license. Good ol’ Cacti was the quickest way to do accomplish that.
Launch a new R81.10 VM and create /var/log/mdss.json with the hostname and new IP address
On the old R80.40 VM, perform an export (this will result in services being stopped for ~ 15 minutes)
On the new R81.10 VM, perform an import. This will take about 30 minutes
If using BYOL, re-issue the license with the new IP address
Performing Export on old R80.40 Server
On the old R80.40 server, in GAIA, navigate to Maintenance -> System Backups. If not done already, run a backup. This will give a rough idea of how long the export job will take and the approximate file size including logs.
So for me, the export size can be assumed to be just under 1.2 GB. Then go to CLI and enter expert mode. First, run migrate_server verify
expert

cd $FWDIR/scripts

./migrate_server verify -v R81.10
The verify operation finished successfully.
Now actually do the export. Mine took about 15 minutes and resulted in 1.1 GB file when including logs.
./migrate_server export -v R81.10 -l /var/log/export.tgz

The export operation will eventually stop all Check Point services (cpstop; cpwd_admin kill). Do you want to continue (yes/no) [n]? yes

Exporting the Management Database
Operation started at Thu Jan  5 16:20:33 UTC 2023

[==================================================] 100% Done

The export operation completed successfully. Do you wish to start Check Point services (yes/no) [y]? y
Starting Check Point services ...
The export operation finished successfully.
Exported data to: /var/log/export.tgz.
Then copy the image to something offsite using SCP or SFTP.
ls -la /var/log/export.tgz
-rw-rw---- 1 admin root 1125166179 Jan  5 17:36 /var/log/export.tgz

scp /var/log/export.tgz billy@10.1.2.6:
Setting up the new R81.10 Server
After launching the VM, SSH in and set an admin user password and expert mode password. Then save config:
set user admin password

set expert-password

save config
Login to the Web GUI and start the setup wizard. This is pretty must just clicking through a bunch of “Next” buttons. It is recommend to enable NTP though and uncheck “Gateway” if this is a management-only server.
When the setup wizard has concluded, download and install SmartConsole, then the latest Hotfix
One rebooted, login via CLI, go to expert mode, and create a /var/log/mdss.json file that has the name of the Management server (as it appears in SmartConsole) and the new server’s internal IP address. Mine looks like this:
It’s not a bad idea to paste this in to a JSON Validator to ensure the syntax is proper. Also note the square outer brackets, even though there’s only one entry in the array.
Importing the Database
Now we’re ready to copy the exported file from the R80.40 server. /var/log typically has the most room, so that’s a good location. Then run the import command. For me, this took around 20-30 minutes.
scp billy@10.1.2.6:export.tgz /var/log/

cd $FWDIR/scripts
./migrate_server import -v R81.10 -l /var/log/export.tgz

Importing the Management Database
Operation started at Thu Jan  5 16:51:22 GMT 2023

The import operation finished successfully.
If a “Failed to import” message appears, check the /var/log/mdss.json file again. Make sure the brackets, quotes, commas, and colons are in the proper place.
After giving the new server a reboot for good measure, login to CLI and verify services are up and running. Note it takes 2-3 minutes for the services to be fully running:
cd $FWDIR/scripts
./cpm_status.sh
Check Point Security Management Server is during initialization

./cpm_status.sh
Check Point Security Management Server is running and ready
I then tried to login via R81.10 SmartConsole and got this message:
This is expected. The /var/log/mdss.json only manages the connection to the gateways, it doesn’t have anything to do with licensing for the management server itself. And, I would guess that doing the import results in the 14 day trial license being overridden. Just to confirm that theory, I launched a PAYG VM, re-did the migration, and no longer saw this error.
Updating the Management Server License
Login to User Center -> Assets/Info -> Product Center, locate the license, change the IP address, and install the new license. Since SmartConsole won’t load, this must be done via CLI.
cplic put 10.22.33.44 never XXXXXXX
I then gave a reboot and waited 2-3 minutes for services to fully start. At this point, I was able to login to SmartConsole and see the gateways, but they all showed red. This is also expected – to make them green, policy must be installed.
I first did a database install for the management server itself (Menu -> Install Database), which was successful. Then tried a policy install on the gateways and got a surprise – the policy push failed, complaining of a connection failure.
From the Management Server, I tried a basic telnet test for port 18191 and it did indeed fail:
telnet 10.22.33.121 18191
Trying 10.22.33.121..
At first I thought the issue was firewall rules, but concluded that the port 18191 traffic was reaching the gateway but being rejected, which indicates a SIC issue. Sure enough, a quick Google pointed me to this:
Indeed, the CheckPoint deployment template for GCP uses “member-a” and “member-b” as the hostname suffix for the gateways, but we give them a slightly different name in order to be consistent with our internal naming scheme.
The fix is change the hostname in the CLI to match the gateway name configured in SmartConsole:
cp-cluster-member-a> set hostname newhostname
cp-cluster-member-01> set domainname mydomain.org
cp-cluster-member-01> save config
After that, the telnet test to port 18191 was successful, and SmartConsole indicated some communication:
Looking long term, a better solution is just leave the cluster members with the default ‘member-a/b’ hostnames and configure SmartConsole to match.
Now I have to reset SIC on both gateways:
cp-cluster-member-01> cpconfig
This program will let you re-configure
your Check Point products configuration.

Configuration Options:
----------------------
(1)  Licenses and contracts
(2)  SNMP Extension
(3)  PKCS#11 Token
(4)  Random Pool
(5)  Secure Internal Communication
(6)  Disable cluster membership for this gateway
(7)  Enable Check Point Per Virtual System State
(8)  Enable Check Point ClusterXL for Bridge Active/Standby
(9)  Hyper-Threading
(10) Check Point CoreXL
(11) Automatic start of Check Point Products

(12) Exit

Enter your choice (1-12) :5


Configuring Secure Internal Communication...
============================================
The Secure Internal Communication is used for authentication between
Check Point components

Trust State: Trust established

 Would you like re-initialize communication? (y/n) [n] ? y

Note: The Secure Internal Communication will be reset now,
and all Check Point Services will be stopped (cpstop).
No communication will be possible until you reset and
re-initialize the communication properly!
Are you sure? (y/n) [n] ? y
Enter Activation Key:
Retype Activation Key:
initial_module:
Compiled OK.
initial_module:
Compiled OK.

Hardening OS Security: Initial policy will be applied
until the first policy is installed

The Secure Internal Communication was successfully initialized

Configuration Options:
----------------------
(1)  Licenses and contracts
(2)  SNMP Extension
(3)  PKCS#11 Token
(4)  Random Pool
(5)  Secure Internal Communication
(6)  Disable cluster membership for this gateway
(7)  Enable Check Point Per Virtual System State
(8)  Enable Check Point ClusterXL for Bridge Active/Standby
(9)  Hyper-Threading
(10) Check Point CoreXL
(11) Automatic start of Check Point Products

(12) Exit

Enter your choice (1-12) :12

Thank You...
cpwd_admin:
Process AUTOUPDATER terminated
cpwd_admin:
Process DASERVICE terminated
The services will restart, which triggers a failover. At this point, I went in to Smart Console, edited the member, reset SIC, re-entered the key, and initialized. The policy pushes then were successful and everything was green. The last remaining issue was an older R80.30 cluster complaining of the IDS module not responding. This resolved itself the next day.
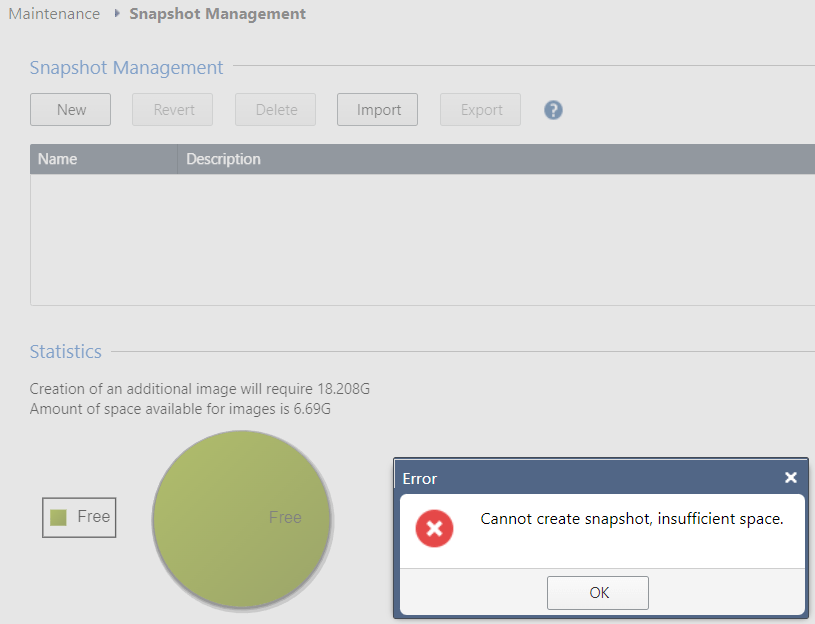
As we enter the last year of support for CheckPoint R80.40, it’s time to finally get all management servers upgraded to R81.10 (if not done already). But I ran in to a problem when creating a snapshot on our management server in GCP:
This screen didn’t quite make sense because it says 6.69 GB are free, but the root partition actually shows 4.4 GB:
As it turns out, the 6 GB mentioned is completely un-partitioned space set aside for GAIA internals:
[Expert@chkpt-mgr:0]# lvm_manager -l

Select action:

1) View LVM storage overview
2) Resize lv_current/lv_log Logical Volume
3) Quit
Select action: 1

LVM overview
============
                  Size(GB)   Used(GB)   Configurable    Description
    lv_current    20         16         yes             Check Point OS and products
    lv_log        43         27         yes             Logs volume
    upgrade       22         N/A        no              Reserved for version upgrade
    swap          8          N/A        no              Swap volume size
    free          6          N/A        no              Unused space
    -------       ----
    total         99         N/A        no              Total size
This explains why the disk space is always inadequate – 20 GB for root, 43 GB for log, 22 GB for “upgrade” (which can’t be used in GCP), 8 GB swap, and the remaining 6 GB set aide for snapshots (which is too small to be of use).
To create enough space for a snapshot we have only one solution: expand the disk size.
List of Steps
After first taking a Disk Snapshot of the disk in GCP, I followed these steps:
! On VM, in expert mode:
rm /etc/autogrow
shutdown -h now

! Use gcloud to increase disk size to 160 GB
gcloud compute disks resize my-vm-name --size 160 --zone us-central1-c

! Start VM up again
gcloud compute instances start my-vm-name --zone us-central1-c
After bootup, ran parted -l and verify partition #4 has been added:
Expert@ckpt:0]# parted -l

Model: Google PersistentDisk (scsi)
Disk /dev/sda: 172GB
Sector size (logical/physical): 512B/4096B
Partition Table: gpt
Disk Flags:

Number  Start   End     Size    File system     Name       Flags
 1      17.4kB  315MB   315MB   ext3                       boot
 2      315MB   8902MB  8587MB  linux-swap(v1)
 3      8902MB  107GB   98.5GB                             lvm
 4      107GB   172GB   64.4GB                  Linux LVM  lvm


Model: Linux device-mapper (linear) (dm)
Disk /dev/mapper/vg_splat-lv_log: 46.2GB
Sector size (logical/physical): 512B/4096B
Partition Table: loop
Disk Flags:

Number  Start  End     Size    File system  Flags
 1      0.00B  46.2GB  46.2GB  xfs


Model: Linux device-mapper (linear) (dm)
Disk /dev/mapper/vg_splat-lv_current: 21.5GB
Sector size (logical/physical): 512B/4096B
Partition Table: loop
Disk Flags:

Number  Start  End     Size    File system  Flags
 1      0.00B  21.5GB  21.5GB  xfs
Then converted the partition to an empty volume and gave it to GAIA:
[Expert@cp-member-a:0]# $FWDIR/scripts/google_ha_test.py
GCP HA TESTER: started
GCP HA TESTER: checking access scopes...
GCP HA TESTER: ERROR

Expecting value: line 1 column 1 (char 0)
Got this message when trying to test a CheckPoint R81.10 cluster build in a new environment. Obviously, this error message is not at all helpful in determining what the problem is. So I wrote a little debug script to try and isolate the issue:
import traceback
import gcp as _gcp

global api
api = _gcp.GCP('IAM', max_time=20)
metadata = api.metadata()[0]

project = metadata['project']['projectId']
zone = metadata['instance']['zone'].split('/')[-1]
name = metadata['instance']['name']

print("Got metadata: project = {}, zone = {}, name = {}\n".format(project, zone, name))
path = "/projects/{}/zones/{}/instances/{}".format(project, zone, name)

try:
    head, res = api.rest("GET",path,query=None, body=None,aggregate=False)
except Exception as e:
    print(traceback.format_exc())
Running the script, I now see an exception when trying to make the initial API call:
[Expert@cp-cluster-member-a:0]# cd $FWDIR/scripts
[Expert@cp-cluster-member-a:0]# python3 ./debug.py

Got metadata: project = myproject, zone = us-central1-b, name = cp-member-a

Traceback (most recent call last):
  File "debug.py", line 18, in <module>
    head, res = api.rest(method,path,query=None,body=None,aggregate=False)
  File "/opt/CPsuite-R81.10/fw1/scripts/gcp.py", line 327, in rest
    max_time=self.max_time, proxy=self.proxy)
  File "/opt/CPsuite-R81.10/fw1/scripts/gcp.py", line 139, in http
    headers['_code']), headers, repr(response))
gcp.HTTPException: Unexpected HTTP code: 403
This at least indicates the connection to the API is OK and it’s some type of permissions issue with the account.
The CheckPoints have always been really tough to troubleshoot in this aspect, so to keep it simple, I deploy them with the default service account for the project. It’s not explicitly called out
I was able to re-enabled Editor permissions for the default service account with this Terraform code:
# Set Project ID via input variable
variable "project_id" {
  description = "GCP Project ID"
  type = string
}
# Get the default service account info for this project
data "google_compute_default_service_account" "default" {
  project = var.project_id
}
# Enable editor role for this service account
resource "google_project_iam_member" "default_service_account_editor" {
  project = var.project_id
  member  = "serviceAccount:${data.google_compute_default_service_account.default.email}"
  role    = "roles/editor"
}
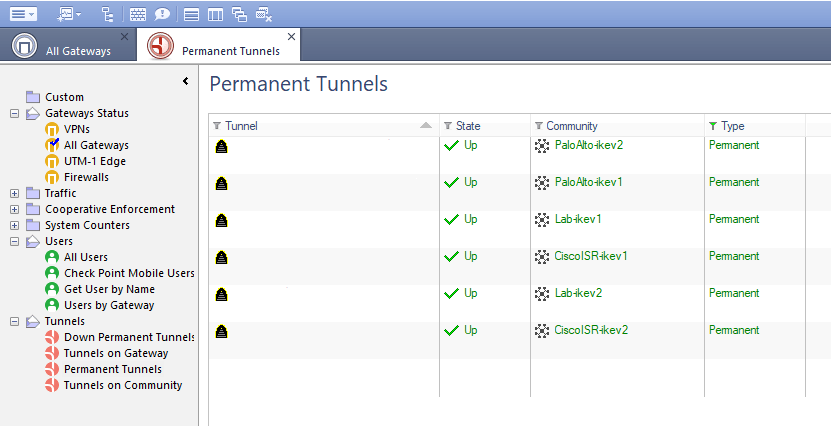
Being fairly new to CheckPoint, I hadn’t yet used SmartView monitor, which is the windows desktop monitoring application. At first glance it wasn’t very useful. I had terminated several test tunnels to various Cisco, FortiGate, and Palo Alto firewalls, all of which were working fine. But they all showed down in SmartView. What the heck?
Reason: When it comes to monitoring tunnels, CheckPoint by default uses a proprietary protocol they call “tunnel_test” (udp/18234). In order to properly monitor VPN tunnels to Non-CheckPoint Devices, DPD (dead peer detection) must be used.
Here’s how to enable DPD on an interoperable device:
In the CheckPoint SmartConsole folder (usually C:\Program Files (x86)\CheckPoint\SmartConsole), run GuiDBedit.exe
Under Network Objects folder -> network_objects, look for the interoperable device Object. The class name will be “gateway_plain”
Search for Field name tunnel_keepalive_method and change it to dpd
File -> Save All, exit.
Restart SmartConsole and install policy to the applicable Checkpoint gateways / clusters
After making that change, pushing policy, and restarting SmartView Monitor, the tunnels now show green:
I had previously done Cisco router to CheckPoint R80.30 gateway VPNs before without issue, but for whatever reason could not even establish phase 1 for this one. CheckPoint R80 VPN communities default to AES-256, SHA-1, Group 2, and 1-day timetime which is easy to match on the Cisco with this config:
After verifying connectivity, doing packet captures, and multiple reboots on on both ends, IKE simply would not come up. On the Cisco ISR, debug crypto isakmp wasn’t especially helpful:
Jun 18 11:06:17.085: ISAKMP: (0):purging SA., sa=3246F97C, delme=3246F97C
Jun 18 11:06:17.285: ISAKMP: (0):SA request profile is (NULL)
Jun 18 11:06:17.285: ISAKMP: (0):Created a peer struct for 35.245.62.190, peer port 500
Jun 18 11:06:17.285: ISAKMP: (0):New peer created peer = 0x2CE62C3C peer_handle = 0x80000005
Jun 18 11:06:17.285: ISAKMP: (0):Locking peer struct 0x2CE62C3C, refcount 1 for isakmp_initiator
Jun 18 11:06:17.285: ISAKMP: (0):local port 500, remote port 500
Jun 18 11:06:17.285: ISAKMP: (0):set new node 0 to QM_IDLE
Jun 18 11:06:17.285: ISAKMP: (0):insert sa successfully sa = 2CE620E8
Jun 18 11:06:17.285: ISAKMP: (0):Can not start Aggressive mode, trying Main mode.
Jun 18 11:06:17.285: ISAKMP: (0):found peer pre-shared key matching 192.0.2.190
Jun 18 11:06:17.285: ISAKMP: (0):constructed NAT-T vendor-rfc3947 ID
Jun 18 11:06:17.285: ISAKMP: (0):constructed NAT-T vendor-07 ID
Jun 18 11:06:17.285: ISAKMP: (0):constructed NAT-T vendor-03 ID
Jun 18 11:06:17.285: ISAKMP: (0):constructed NAT-T vendor-02 ID
Jun 18 11:06:17.285: ISAKMP: (0):Input = IKE_MESG_FROM_IPSEC, IKE_SA_REQ_MM
Jun 18 11:06:17.285: ISAKMP: (0):Old State = IKE_READY New State = IKE_I_MM1
Jun 18 11:06:17.285: ISAKMP: (0):beginning Main Mode exchange
Jun 18 11:06:17.285: ISAKMP-PAK: (0):sending packet to 192.0.2.190 my_port 500 peer_port 500 (I) MM_NO_STATE
Jun 18 11:06:17.285: ISAKMP: (0):Sending an IKE IPv4 Packet.
Jun 18 11:06:17.369: ISAKMP-PAK: (0):received packet from 192.0.2.190 dport 500 sport 500 Global (I) MM_NO_STATE
Jun 18 11:06:17.369: ISAKMP-ERROR: (0):Couldn't find node: message_id 2303169274
Jun 18 11:06:17.369: ISAKMP-ERROR: (0):(0): Unknown Input IKE_MESG_FROM_PEER, IKE_INFO_NOTIFY: state = IKE_I_MM1
Jun 18 11:06:17.369: ISAKMP: (0):Input = IKE_MESG_FROM_PEER, IKE_INFO_NOTIFY
Jun 18 11:06:17.369: ISAKMP: (0):Old State = IKE_I_MM1 New State = IKE_I_MM1
The CheckPoint gave a more “useful” error:
Main Mode Failed to match proposal: Transform: AES-256, SHA1, Group 2 (1024 bit); Reason: Wrong value for: Authentication Method
This seemed to imply the CheckPoint was expecting certificate-based authentication rather than PSK. In traditional mode, the gateway is set by default for certificate only. But it’s not clear how this is configured in newer versions.
After poking around settings for quite a while, I simply deleted the VPN community in CheckPoint SmartConsole and re-created it. The connection then popped up immediately.
Someone changed the admin password, but we could still access the gateway via the SSH key. The processes for resetting the password, bypassing password history was quite easy:
Go to expert mode and generate a hashed string for password ‘ABCXYZ1234’
By default, the CheckPoint will usually have three dynamic objects that can be referenced in firewall and NAT policy rules
LocalGateway – Main interface of the CheckPoint
LocalGatewayExternal – External interface of the CheckPoint
LocalGatewayInternal – First internal interface of the CheckPoint
In a 3-Nic deployment, you may want to reference the second internal NIC, for example to source NAT traffic bound to the internal servers to the CheckPoint’s internal IP address.
To do this, you must create a custom dynamic object in SmartConsole, then manually create it on each gateway.
On the gateway, first verify the internal IP address:
[Expert@gateway]# dynamic_objects -n LocalGateway-eth2 -r 10.1.2.1 10.1.2.1 -a
Verify it’s been created:
[Expert@gateway]# dynamic_objects -l

object name : LocalGateway
range 0 : 198.51.100.100 198.51.100.100

object name : LocalGatewayExternal
range 0 : 198.51.100.100 198.51.100.100

object name : LocalGatewayInternal
range 0 : 10.1.1.10 10.1.1.10

object name : LocalGateway-eth2
range 0 : 10.1.2.1 10.1.2.1