Last year I rolled out PEAP (Cisco 2504 WLC + Windows Server 2012 NPS) to get our wifi secured. One of the nagging problems is I could never eliminate the ‘untrusted certificate’ warning messages when new clients joined. Most of our clients are Macs, and are neither joined to the domain nor trust the internal Windows CA. Secondly, we have iPhones, iPads, and Android phones who fall in to the same boat. So, we’re in reality a BYOD environment. All the examples I could find were Enterprise scenarios that assumes Windows client are joined to the domain, and inherently trust the internal CA.
The original cert used by NPS was set to expire this week, so I figured it would be a good time to try buying one from an external CA. There was some question of which CAs would be trusted by Apple. Fortunately I found these two knowledge base articles:
GoDaddy was then selected as the CA. The first step was to generate a new 2048-bit private key and CSR (Certificate Signing Request). As usual, I use OpenSSL to do this:
$ openssl req -out wifi.mydomain.com.csr -new -newkey rsa:2048 -nodes -keyout wifi.mydomain.com.key
Note that the certificate must be a FQDN hostname as wildcard certs won’t work with Windows.
After submitting the CSR and waiting for their approval, I download the certificate in Apache or IIS format, and end up with a .crt file. Windows requires the cert and key to be bundled together in PKCS12 format, which I’m able to do via this OpenSSL command:
$ openssl pkcs12 -in wifi.mydomain.com.crt -inkey wifi.mydomain.com.key -export -out wifi.mydomain.com.pfx
Enter Export Password:
Verifying - Enter Export Password:
Now the next trick was to actually import this to NPS so it could be used. To to this, I have to go through the Certificate snap-in.
- Remote Desktop to the NPS server
- Copy the .pfx file to C:\Users\Administrator\Documents (I simply used FTP)
- Type MMC at the command prompt
- File -> Add/Remove Snap-ins, Certificates, Add, “Computer account”, Finish
- Under Personal tree, All tasks -> Import. Select the .pfx file that was created

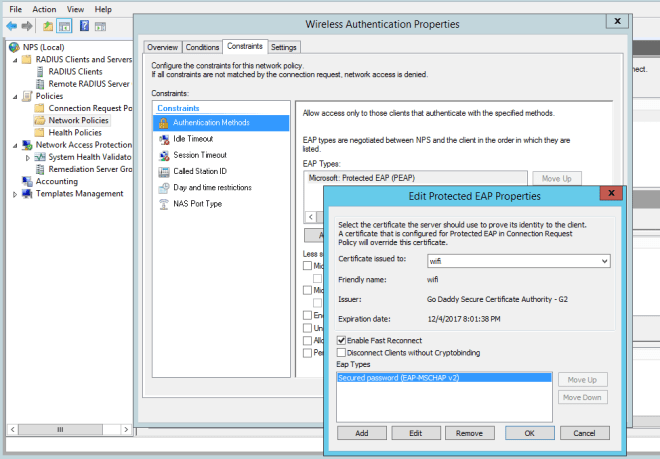
Finally, we’re now ready to have NPS use the new certificate
- Administrative Tools -> Network Policy Server
- Policies -> Network Policies -> Wireless Authentication
- Constraints -> Authentication Methods -> Microsoft: Protected EAP (PEAP) -> Edit
- The new cert should show in the top drop-down menu. Select it and click OK